To use the component with the Azure SSIS Integration Runtime, the component must be installed and configured on the corresponding Azure nodes. The actual installation and licensing of the component takes place via a batch file, which is automatically executed when the Azure SSIS IR is started.
The batch file or the location of the batch file must be defined when creating the Azure SSIS IR.
The batch file to be executed by the Azure SSIS IR during the boot process contains various SQLPhonetics.NET specific settings. If you want to use another component in Azure SSIS IR, refer to the corresponding manufacturer-specific parameters.
The batch file first runs the installer of SQLPhonetics.NET via msiexec. To do this, the MSI file together with the batch file must be on the same blob storage. Then the license system of the SQLPhonetics.NET component is called. The license code you received when you purchased the component are saved here as a parameter.
As a note, the batch file must be named “main.cmd” in order for the Integration Runtime to properly recognize the file and execute the script it contains when starting.
Here you can find a template for the file. You need to replace with the license code you received on purchase.
msiexec /i oh22is.match.setup.msi /qn"C:\Program Files (x86)\oh22information services GmbH\SQLPhonetics.NET for SSIS\oh22is.Licensing.exe" -p 0 -c "" -s true
Make sure that the number of licenses used corresponds to the maximum size of your Azure SSIS IR.
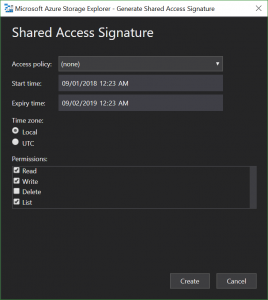
Create a shared access signature for the corresponding blob storage or container on which the batch file was saved. You can easily create a SAS with the Azure Storage Explorer. Note that a date can be specified when creating a SAS. In principle, a date not far in the future is more secure, but this may prevent the Azure SSIS-IR from accessing the blob storage when it is restarted.
For this reason, choose a date that fits the life cycle of your Azure SSIS-IR.
With the new Integration Runtime Setup, you can now easily install third party components via the Azure portal.
Open your already created Azure Data Factory V2 in the Azure Portal and click on “Author & Monitor”. Click on “Configure SSIS Integration Runtime” in the Azure Data Factory to configure a new Azure SSIS-IR.


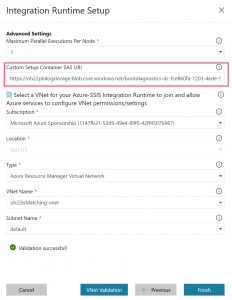
In the last window, under “Custom Setup Container SAS URI”, enter the previously created Shared Access Signature. The UI then automatically validates the specified SAS. Then click on the “Validate VNet” button to check your defined VNet.
Once all the information has been validated, the Azure SSIS-IR can be created by using the “Finish” button.
When creating the Azure SSIS-IR, the setup is automatically loaded from the given SAS and executed on all nodes.


